Emma DKIM Setup
DKIM (DomainKeys Identified Mail) is an email authentication protocol that uses cryptographic signatures to verify whether messages were authorized by the domain they claim to come from.
This article provides step-by-step instructions for enabling DKIM in Emma, an email marketing platform built to improve campaign trust and deliverability.
Emma DKIM Requirements
Before you can set up DKIM in your Emma account, you must create three CNAME records with your web hosting or domain provider or, if you’re leveraging Sendmarc for DKIM Management, in DKIM Settings in the Sendmarc platform. This is what your three keys should look like:| Record Type | Name | Value | TTL |
|---|---|---|---|
| CNAME | e2ma-k1._domainkey |
e2ma-k1.dkim.e2ma.net |
Default |
| CNAME | e2ma-k2._domainkey |
e2ma-k2.dkim.e2ma.net |
Default |
| CNAME | e2ma-k3._domainkey |
e2ma-k3.dkim.e2ma.net |
Default |
- Log into Emma and select the Account page from the dropdown menu next to your name.
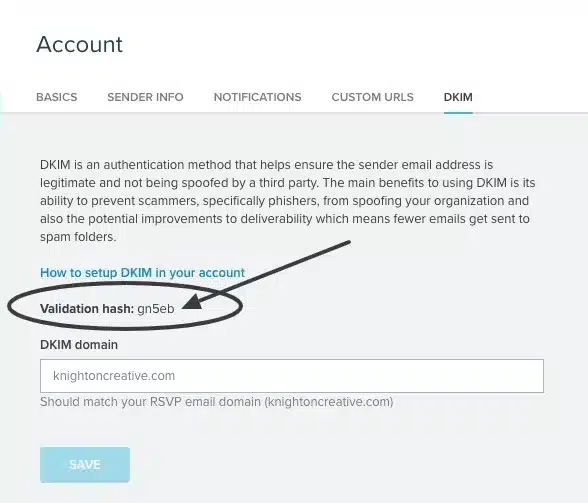
- Click on the last tab for DKIM to reveal your validation hash code.

- Once you have that code, add a TXT record that contains the following value for your domain: e2ma-verification=xxxx and be sure to replace “xxxx” with your validation hash code.
- Once completed, allow your CNAME changes to propagate through the DNS network. That can take anywhere from a few minutes to several hours.
If you come across any issues, it’s best to contact your provider to learn more about the CNAME and TXT record process, as they may have different requirements.
How to activate the DKIM process- Navigate back to your Emma Account page and select the DKIM tab.
- Enter your sender domain (mydomain.com) in the DKIM domain field.
- Clicking to Save will kick off a validation process where Emma checks to see if your CNAME and TXT records are active.
- If everything looks good, you’ll see a success message.
How to update your DKIM settings using Sendmarc
To update your DKIM record through Sendmarc, please refer to the Sendmarc DKIM Setup Documentation.
Emma’s Documentation
Emma’s official DKIM configuration guide can be found here.
Looking for SPF Settings?
Find out how to configure your Emma SPF settings here.
