N-Able Mail Assure DKIM Setup
DKIM (DomainKeys Identified Mail) uses cryptographic signatures to help verify that emails are genuinely from your domain and haven’t been altered in transit. When enabled, it adds a digital signature to outgoing messages that recipients’ mail servers can validate using your published public DKIM key.
Mail Assure gives you two options for DKIM signing:
You can enable DKIM signing directly through the Mail Assure portal
Or you can continue signing emails on your own mail server (MTA), if it’s already configured to do so.
Tip: If your sending mail server is already signing emails with DKIM, there’s no need to enable DKIM signing in Mail Assure. Otherwise, follow the steps below to generate a Mail Assure DKIM key and publish it in your DNS
Mail Assure DKIM Requirements
- Login to Mail Assure to the Domain Level Control Panel.
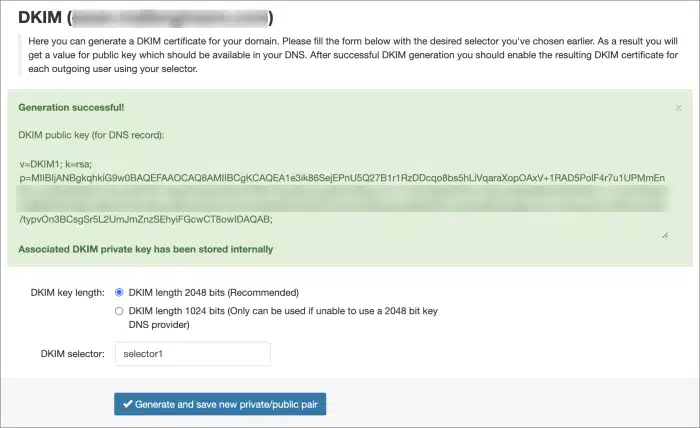
- Select Outgoing > DKIM.
- Choose the DKIM key length (we recommend using 2048, if your DNS accepts it).
- Enter the DKIM selector and click on Generate and save new private/public pair.
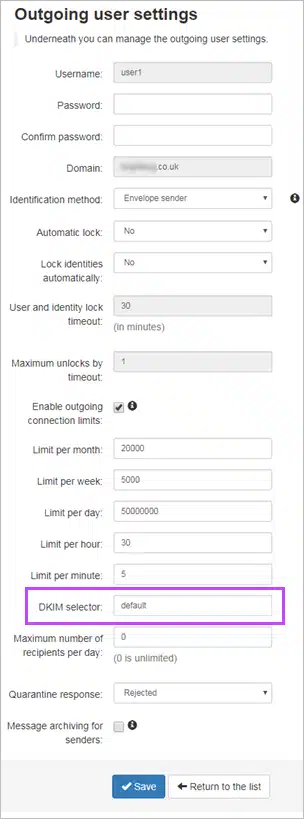
 5. Once the key has been generated, create a the required record either in your DNS, or in Sendmarc DKIM Management if you’re leveraging it.6. In the Mail Assure’s Outgoing > Manage Outgoing Users/Authentication page for your Outgoing User/Authentication Method edit this to enter what was used in step #4 in the DKIM Selector field.
- Click Save and your mails should now be DKIM signed.
How to update your DKIM settings using Sendmarc
To update your DKIM record through Sendmarc, please refer to the Sendmarc DKIM Setup Documentation.
Mail Assure Documentation
Mail Assure‘s official DKIM configuration guide can be found here.
Looking for SPF Settings?
Find out how to configure your Mail Assure DKIM Setup SPF settings here.

