Microsoft 365/Exchange DKIM Setup
DomainKeys Identified Mail (DKIM) is an email authentication method that helps protect your domain from spoofing and phishing attacks. It works by adding a digital signature to every email your organization sends. When a recipient’s mail server receives your message, it uses this signature to verify that the message hasn’t been altered and truly came from your domain.
This guide outlines how to configure DKIM for Microsoft 365 Exchange, Microsoft’s cloud-based email and productivity platform
Microsoft 365 DKIM Requirements
To enable DKIM signing for Microsoft 365, follow these steps.
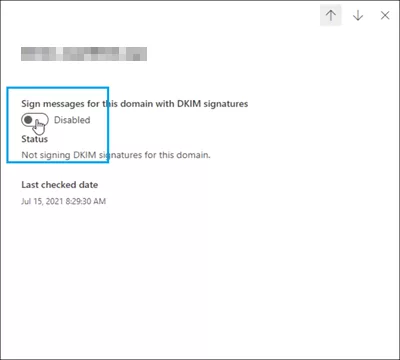
- Click on the domain you wish to configure DKIM on DKIM page (https://security.microsoft.com/dkimv2 or https://protection.office.com/dkimv2).

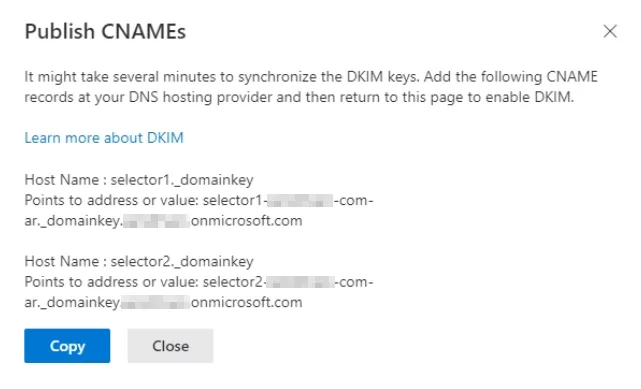
- Slide the toggle to “Enable“. You will see a pop-up window stating that you need to add CNAME records.

- Copy the CNAMES shown in the pop up window.

- Publish these keys into your DNS. If you’re using Sendmarc to manage your DKIM keys, follow the process here.
- Return to the “DKIM page” and toggle the switch to enable DKIM.
How to update your DKIM settings using Sendmarc
To update your DKIM record through Sendmarc, please refer to the Sendmarc DKIM Setup Documentation.
Microsoft 365/Exchange Documentation
Refer to Microsoft 365’s official documentation for DKIM setup here.
Looking for SPF Settings?
Find out how to configure your Microsoft 365 SPF settings here.


