Rackspace DKIM Setup
DKIM (DomainKeys Identified Mail) adds a digital signature to your outgoing emails, allowing receiving servers to confirm the messages were sent from your domain and weren’t altered in transit. Enabling DKIM helps improve deliverability and protects your domain from impersonation.
Rackspace provides hosted email and Microsoft 365 services, both of which support DKIM for domain authentication and security.
This guide will show you how to set up DKIM for your domain when using Rackspace email services.
Rackspace DKIM Requirements
Step 1: Access the Cloud Office Control Panel
Log in to the Rackspace Cloud Office Control Panel
On the Home page, go to the Domains section
Click on the Sender Authentication (DKIM) link
Step 2: Enable DKIM for Your Domain
On the DKIM page, select the domain you want to configure
Click Enable DKIM
Step 3: Configure DNS Based on Your DNS Host
If Rackspace Manages Your DNS
DKIM will be enabled automatically—no further action is required.
If You Use an External DNS Provider
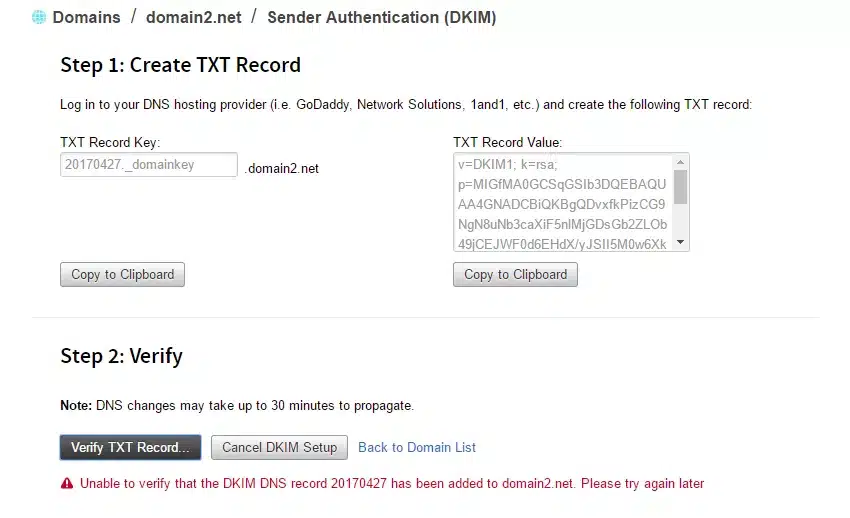
Rackspace will provide a DNS key and value to be added as a TXT record in your DNS
Log in to your external DNS provider (e.g., Cloudflare, GoDaddy or Sendmarc). If you’re using Sendmarc, you can add the keys there.
Add the provided DKIM TXT record to your DNS settings
Be sure to use the exact name and value provided by Rackspace.
Step 4: Verify the DKIM Record
Once you’ve added the TXT record:
Return to the Sender Authentication (DKIM) page in Rackspace
Click Verify TXT Record
Rackspace will check for DNS propagation and validate the record
If the validation fails, an error message will guide you to correct the issue.
Once verified, DKIM will be active and all new outgoing emails from your domain will be signed using the new DKIM key.
How to update your DKIM settings using Sendmarc
To update your DKIM record through Sendmarc, please refer to the Sendmarc DKIM Setup Documentation.
Rackspace’s Documentation
Rackspace’s official DKIM configuration guide can be found here.
Looking for SPF Settings?
Find out how to configure your Rackspace SPF settings here.