Amazon SES DKIM Setup
DKIM (DomainKeys Identified Mail) is an authentication standard that uses cryptographic signatures to verify that emails are sent from an authorized domain and have not been altered in transit.
This guide details how to configure DKIM using Amazon Simple Email Service (SES), including Easy DKIM, domain verification, and identity management.
Amazon SES DKIM Requirements
Step-by-Step: Set Up Easy DKIM
Sign in to the AWS Management Console and open the Amazon SES console at
https://console.aws.amazon.com/ses/In the left-hand navigation pane, under Configuration, click Verified identities.
From the list, select the identity (domain) you want to configure where the Identity type is set to Domain.
Navigate to the Authentication tab and find the DomainKeys Identified Mail (DKIM) section. Click Edit.
In the Advanced DKIM settings section:
Select the Easy DKIM option under Identity type.
Choose a DKIM signing key length: either
RSA_2048_BIT(recommended) orRSA_1024_BIT.Ensure the DKIM signatures option is checked as Enabled.
Click Save changes.
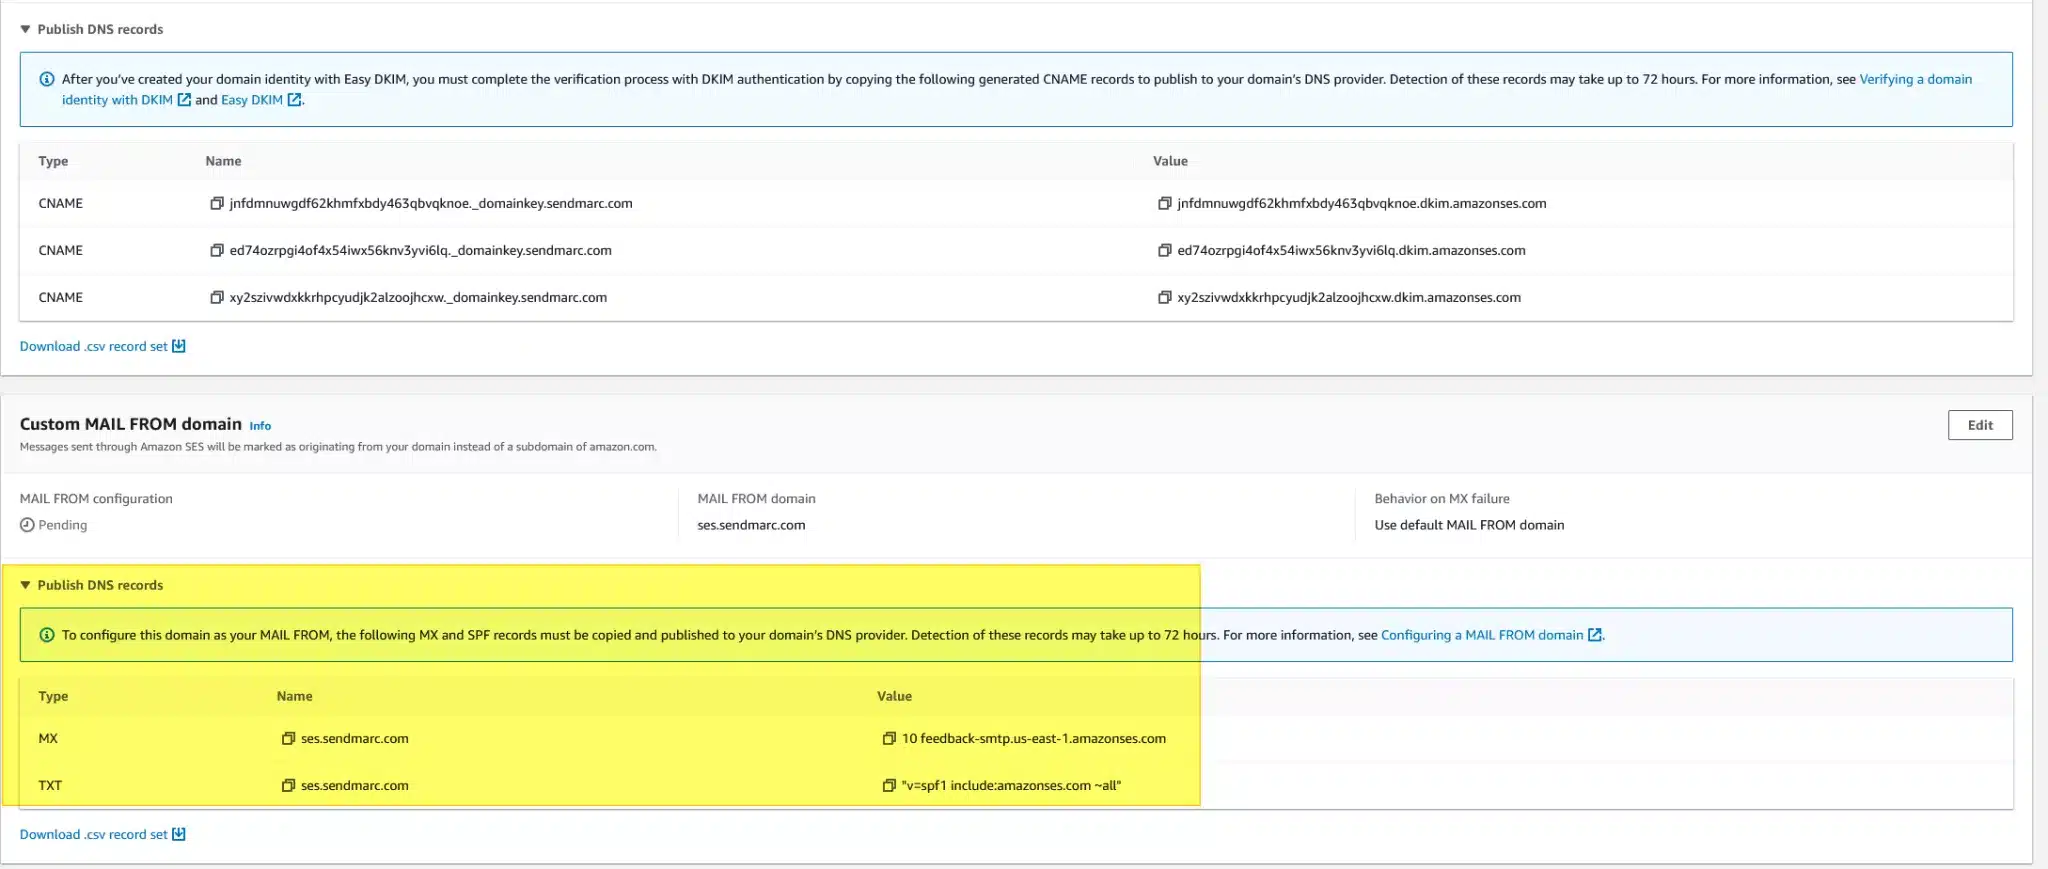
Once Easy DKIM is configured, Amazon SES will generate three CNAME records for your domain.
Go to your DNS provider and add the three CNAME records exactly as shown in the SES console. If you’re using Sendmarc to manage your DKIM keys, add the keys there. This step completes the verification process.
Important: These records must be added in your DNS host’s control panel, not within AWS.
After you’ve added the records, return to SES. Verification may take several minutes to a few hours depending on your DNS provider.
Creating a Domain Identity in Amazon SES
Sign in to the AWS Management Console and open the Amazon SES console:
https://console.aws.amazon.com/ses/In the navigation pane, under Configuration, click Verified identities.
Click Create identity.
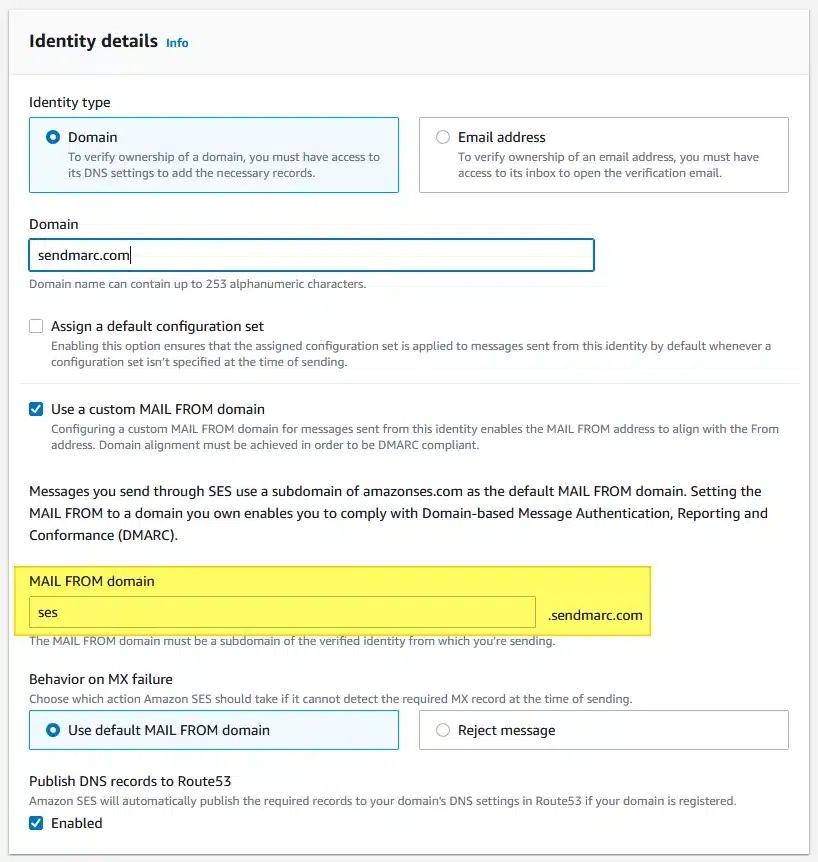
Under Identity details, select Domain as the type of identity.
Note: You must have access to your domain’s DNS settings to complete verification.
In the Domain field, enter the full domain or subdomain you want to verify.
Check the Use a custom MAIL FROM domain box.
In the MAIL FROM domain field, enter a subdomain (e.g.,
mail.example.com) of the domain you’re verifying.Choose your Behavior on MX failure:
Use default MAIL FROM domain – SES will fallback to an amazonses.com subdomain if your MAIL FROM domain isn’t properly configured.
Reject message – SES will reject any email from this domain if the MAIL FROM domain’s MX record is not properly set.
(Optional) If you want to use a custom MAIL FROM domain:
Ensure that the DKIM signatures checkbox is enabled.
Click Add new tag, enter a Key, and optionally a Value.
Repeat for up to 50 tags. Use Remove to delete any tag.
(Optional) Add tags to organize and manage your domain identity:
Click Create identity.
Next Steps
After creating the domain identity, Amazon SES will provide DNS records for domain verification and DKIM configuration. You’ll need to:
Add these records to your DNS provider’s control panel.
Wait for verification and DKIM authentication to complete (this can take a few minutes to several hours, depending on DNS propagation).
Once complete, your domain will be authorized to send authenticated email via Amazon SES using DKIM.


Once you have completed all of these tasks you will have DKIM and full alignment across your Amazon SES environment.
How to update your DKIM settings using Sendmarc
To update your DKIM record through Sendmarc, please refer to the Sendmarc DKIM Setup Documentation.
Amazon’s Documentation
Amazon’s official DKIM configuration guide can be found here.
Looking for SPF Settings?
Find out how to configure your Amazon SES SPF settings here.